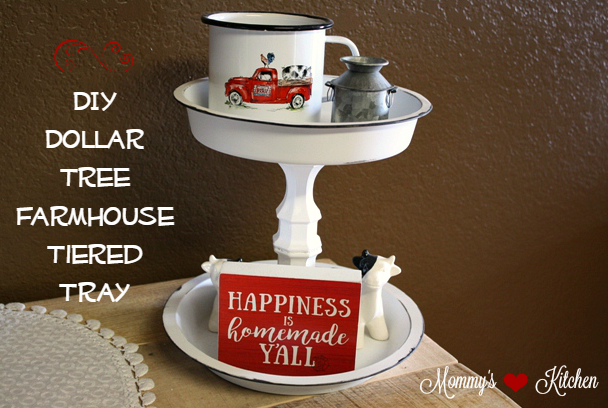
How to make a DIY Farmhouse Inspired Faux Enamelware Tiered Tray using Dollar Tree Items for under $10.
I love everything about Farmhouse decor. Unfortunately most are to expensive and I'm too budget conscious to purchase them. I've seen these Farmhouse Style Trays in several stores for awhile now and I just love them. They're so versatile and can be used in just about any room of your home.
I know this because I have already made 5 of these DIY tiered trays. One for my daughter in-law, two for my kitchen, one for my bathroom and my daughter rooms to hold her all her perfumes. So you see they can be used just about anywhere you have room for them. The one pictured above is in my kitchen with my little red truck cup an and a few other farmhouse items.
I made the second one to add to my coffee station to hold all my coffee pods along with my sugar and creamer set. I love how they turned out and the cost was just under $10 to make both trays!! So today I am going to show you how I made an affordable Farmhouse Inspired Tiered Tray using Dollar Tree items and a few things that I already had on hand (glue, adhesive bond and paint).
Hopefully you too will want to save a few dollars and make one or two of these Farmhouse tiered trays for yourself. Trust me once you make one you will be making more, because they're so simple, affordable, and addicting. The fun part is finding all the little items you want to add to your new tray.
Everything I purchased to make this tray was purchased at the Dollar Tree with the exception of the glue gun, glue sticks, E-6000 adhesive and the chalk paint (all of which I already had on hand).
I love using chalk paint for diy projects because there is no prep or priming needed before your get started. It also has a super matte finish and bonds to metal, wood, ceramic, glass and canvas. The hardest part about this whole project is waiting for the paint and the adhesive to dry.
I chose to make my tray similar to and old enamelware tray by using black chalk paint and painting around the rim as well as little chip spots around the tray. When the tray was all finished, I was shocked at how similar it looked compared to the real enamelware.
Now onto the fun part.... Decorating. I plan on making another tiered tray around the holidays so I can display some of my farmhouse Christmas items. I think I might paint the enamelware effect in red.
Yield: 1

DIY Farmhouse Tiered Tray
How to make a DIY Farmhouse Inspired Faux Enamelware Tiered Tray using Dollar Tree Items for under $10
Ingredients
- 1 - Dollar Tree pie plate
- 1 - Dollar Tree cake pan
- 2 - (4) inch Dollar Tree glass taper candle holders
- glue gun & glue sticks (I use Gorilla Glue glue sticks)
- E-6000 permanent clear adhesive bond
- Chalk Spray Paint (I used Rustoleum Chalked in Linen White)
- sponge paint Brush + smaller paint brush
- black acrylic or black chalk paint (I used Waverly chalk paint in ink)
- sandpaper
Instructions
- Start by spray painting the pie plate, cake pan and both glass candle holders using the spray chalk paint. Make sure to do this is in a well ventilated area.
- Spray on one coat and let everything dry for 1 hour. Spray on a second coat of chalk paint and let the pans and candle holders dry overnight.
- Using the sandpaper rub away some of the paint in different spots to give the pans a distressed look. Concentrate around the rims and sides and bottom of cake pan.
- Apply E-6000 clear adhesive to the bottom of one candle holder. Add a a layer of hot glue on top of the adhesive and immediately press the candle holder down onto the bottom middle of the pie pan. The hot glue instantly adheres the candle holder and the E-6000 adhesive provides the permanent bond.
- Apple E-6000 around the top edge of each candle holder (the small part where the candle goes inside). Apple a layer of hot glue and then invert the second candle holder over the first one to match the part where you place the candle.
- Now you have one large column that the cake pan will adhere to. Apple E-6000 adhesive to the large end of the candle holder as well as a layer of hot glue. Press the cake pan onto the bottom part of the candle holder. If any of
- the adhesive drips, immediately wipe with a wet paper towel.
- Let the tiered tray dry overnight. I like to place filled mason jars on top of the cake pans to use as weights as the trays sit overnight (candles work well too) .
- After the tray is completely dry paint around the rim with black chalk paint using a foam paint brush to achieve the enamel ware effect and chip marks.
- Keep in mind full adhesion is achieved after 72 hours of dry time, but I find it seems to be dry and adhered after 24, but check to make sure before adding any decor to your tray.
Inspired by: The Daily Diyer

.png)


1 comment